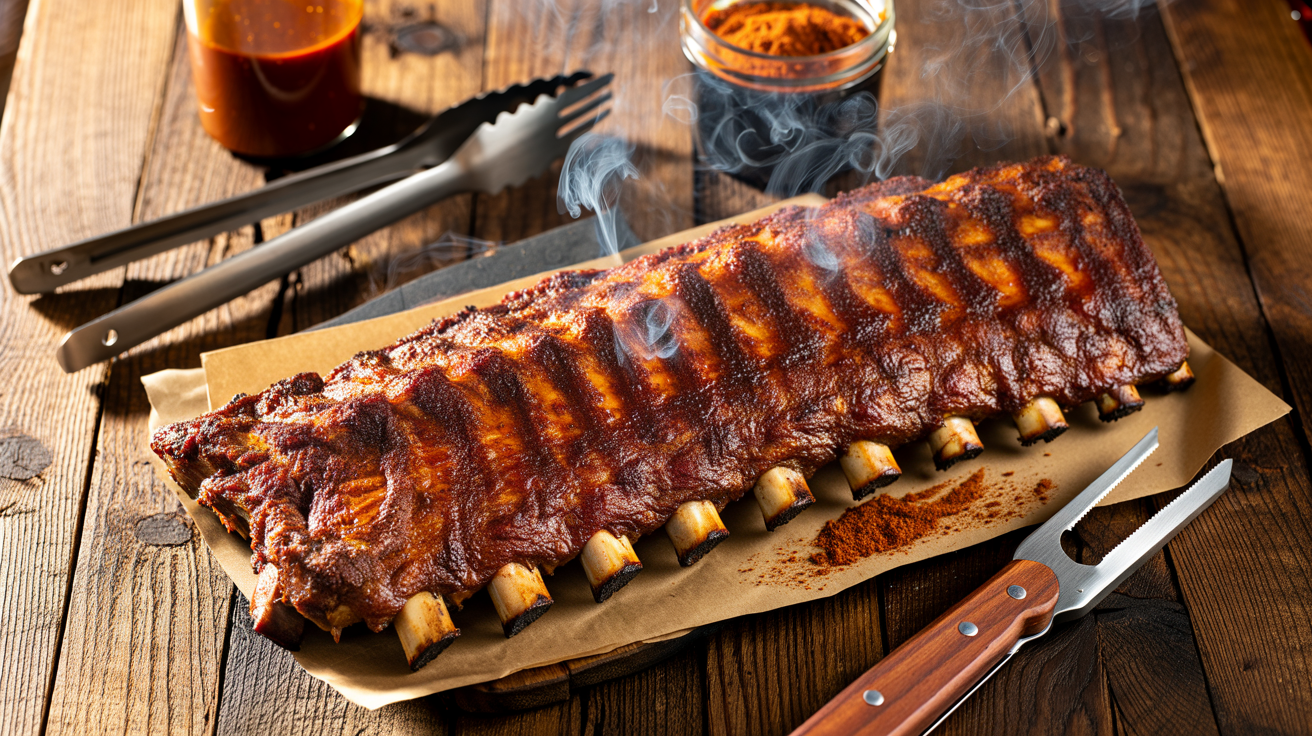
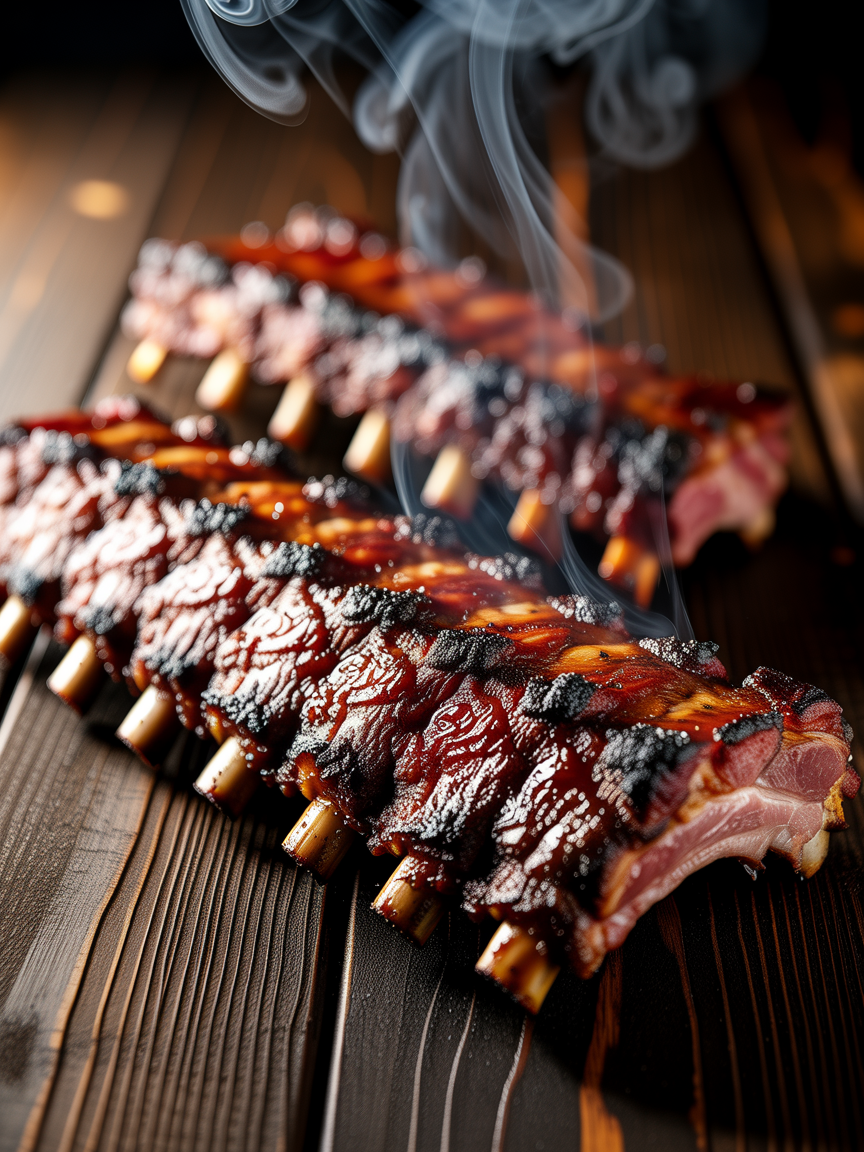
The 3 2 1 ribs recipe is one of the most celebrated techniques in the world of backyard BBQ, and for good reason – it delivers consistently fall-off-the-bone baby back ribs with a gorgeous mahogany bark and a smoke ring that will make your guests do a double take. The method breaks down into three distinct phases: 3 hours of open smoke at 225 degrees Fahrenheit, 2 hours wrapped tight in foil to braise in their own juices, and 1 final hour unwrapped to tighten that bark and set your sauce. Each phase has a specific purpose, and when you nail all three, the result is pure BBQ magic.
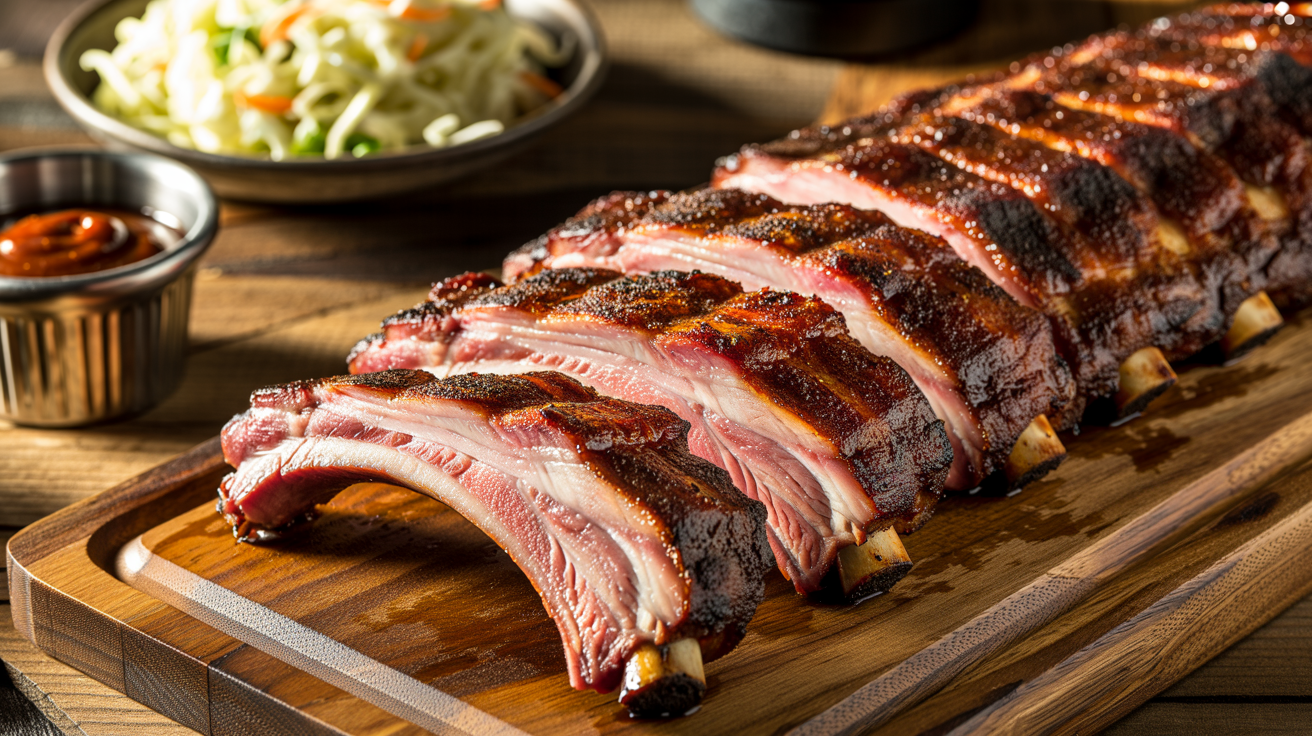
Baby back ribs are the perfect cut for this method. They are leaner and more tender than spare ribs, and they respond beautifully to the low and slow treatment that smoking demands. The 6-hour cook time might sound like a commitment, but that hands-off time is what separates backyard grilling from true competition-level BBQ. You are not just cooking meat – you are building layers of smoke, spice, and rendered fat that no oven or gas grill can fully replicate. The internal temp you are targeting in the final phase is right around 195 to 203 degrees Fahrenheit, which is where the collagen fully breaks down and that melt-in-your-mouth texture becomes reality.
At GrillMasterHQ, we have smoked hundreds of racks using this exact method and refined every detail along the way – from the dry rub ratio to the wood choice to the exact moment you pull the foil back. Whether you are smoking on a classic offset smoker, a kettle charcoal grill, or a modern pellet smoker, this guide will walk you through every step with pitmaster-level detail. Get your fire going, grab a cold drink, and let us turn a raw rack of ribs into something truly legendary.
3 2 1 Ribs Recipe: Perfect Smoked Baby Back Ribs
The 3 2 1 ribs recipe is the gold standard method for smoking baby back ribs low and slow to fall-off-the-bone perfection. With three simple phases, you get incredible bark, a deep smoke ring, and buttery tender meat every single time. Fire up that smoker today and taste the difference.
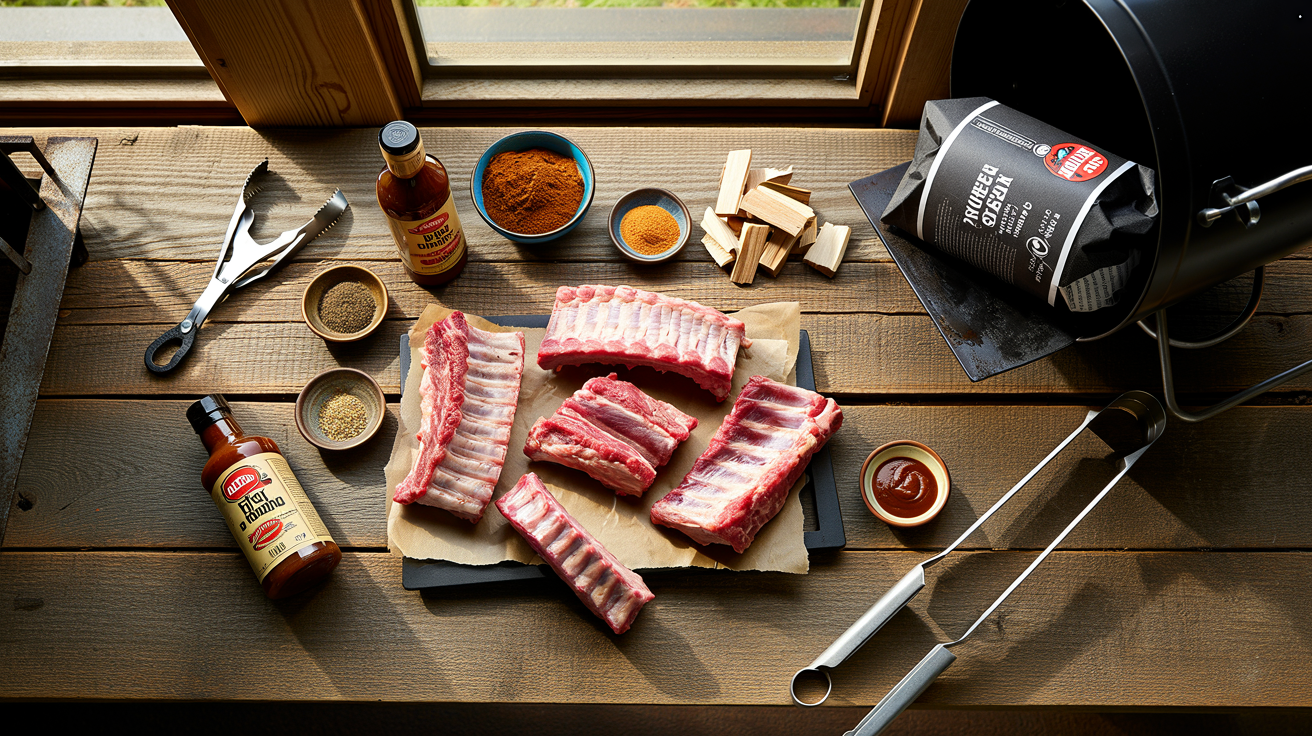
Ingredients
| AMOUNT | INGREDIENT | NOTES |
|---|---|---|
| 2 racks | baby back ribs | approximately 2 to 2.5 lbs each, membrane removed from the bone side |
| 3 tablespoons | yellow mustard | used as a binder to help the dry rub adhere to the meat |
| 3 tablespoons | brown sugar | light or dark both work, adds sweetness and helps build bark |
| 2 tablespoons | smoked paprika | adds deep color and smoky base flavor to the rub |
| 1 tablespoon | kosher salt | coarse kosher salt for proper seasoning penetration |
| 1 tablespoon | black pepper | coarsely ground for texture and bite |
| 1 tablespoon | garlic powder | not garlic salt – pure powder for clean flavor |
| 1 tablespoon | onion powder | rounds out the savory base of the rub |
| 1 teaspoon | cayenne pepper | adjust up or down based on your heat preference |
| 1 teaspoon | chili powder | adds earthiness and depth to the overall rub profile |
| 4 tablespoons | unsalted butter | cut into pats, used inside the foil wrap during the braise phase |
| 3 tablespoons | honey | drizzled inside the foil wrap for sweetness and caramelization |
| 0.5 cup | apple juice | poured into the foil packet and used in the spritz bottle during smoking |
| 0.5 cup | apple cider vinegar | mixed with apple juice in the spray bottle for balance and tenderness |
| 0.75 cup | your favorite BBQ sauce | Kansas City style works great here – apply during the final hour |
| 4 chunks | cherry or apple wood chunks | for the smoker – fruitwood pairs beautifully with pork ribs |
Instructions
Nutrition (per serving)
The BBQ Story Behind This Recipe
Baby back ribs have deep roots in American BBQ culture, particularly across the Southern and Midwestern United States where whole-hog cooking traditions shaped the way pitmasters approached every cut of pork. The low and slow philosophy that defines great smoked ribs traces back to the open pit cooking methods of the Carolinas and the hardwood smoke traditions of Texas and Memphis, where competition pitmasters spent generations perfecting the balance between smoke penetration, rendered fat, and tender bite. Memphis in particular became famous for its dry-rubbed ribs, while Kansas City elevated the sauced and glazed style that most backyard pitmasters know and love today. Baby back ribs, cut from the upper portion of the hog near the spine, became a fan favorite because of their natural tenderness and faster cook time compared to larger spare ribs.
The 3 2 1 method itself became widely popularized through the competitive BBQ circuit and the rise of backyard smoking culture in the late 1990s and early 2000s. It gave home cooks a reliable, repeatable framework that removed much of the guesswork from smoking ribs. The technique draws on fundamental barbecue science – the open smoke phase builds the bark and smoke ring, the foiled braising phase powers through the stall and tenderizes the meat, and the final open phase restores texture and allows sauce to caramelize into a sticky, lacquered finish. Today the 3 2 1 method is taught at BBQ schools, celebrated at cook-offs, and shared across pitmaster communities worldwide as the definitive starting point for anyone serious about smoking ribs.
Hot Off the Grill
A Closer Look
Pitmaster Tips for Best Results
- Always remove the membrane from the back of your ribs before seasoning. It takes 30 seconds and makes a significant difference in how smoke and seasoning penetrate the meat. If you leave it on, you will end up with a tough chewy layer on the underside of every bite.
- Maintain your smoker temperature between 220 and 230 degrees Fahrenheit throughout the entire cook. Swings above 250 degrees will dry out the meat in the open smoke phase, and dips below 200 degrees will stall your cook and push your total time past 7 hours. Consistent low and slow heat is the whole game.
- Use fruitwood like cherry, apple, or peach for baby back ribs. These woods produce a milder, sweeter smoke that complements pork without overpowering it. Hickory and oak work too but use them sparingly – a single chunk of hickory alongside two chunks of cherry gives you depth without bitterness.
- The bend test is your backup confirmation for doneness. Pick up the rack from one end with your tongs – if the rack bends at about a 45-degree angle and you see small cracks forming in the bark across the surface, the ribs are done. If the rack holds rigid and straight, they need more time. If it bends so far that it nearly folds in half, they are slightly overcooked but will still be delicious.
- Do not sauce your ribs too early in the final phase. BBQ sauce is loaded with sugar, and if you apply it when the smoker is too hot or too early in the cook, it will burn to a bitter char before the glaze has time to caramelize properly. Apply sauce only in the last 30 to 40 minutes of the cook at 225 degrees Fahrenheit for a perfect sticky finish.
🔧 Pitmaster Equipment
Offset Smoker or Charcoal Kettle Grill: Authentic wood smoke flavor and precise indirect heat control are essential for the full 6-hour low and slow cook.
Instant Read Thermometer: Critical for confirming your internal temp hits the 195 to 203 degree Fahrenheit sweet spot where collagen fully breaks down.
Long Tongs (16-inch or longer): Keep your hands and forearms safely away from the fire when transferring full racks of hot ribs in and out of the smoker.
Heavy Duty Aluminum Foil: Used to wrap the ribs tight during the 2-hour braising phase, trapping steam and juice to power through the stall.
Spray Bottle: Fill with apple juice or apple cider vinegar to spritz the ribs during the smoke phase and keep the bark moist and flavorful.
Wire Rack or Rib Rack: Keeps multiple racks of ribs standing upright so you can fit more on the smoker grate without overlapping.
Basting Brush or Silicone Mop: Apply your BBQ sauce evenly during the final phase to build a sticky, caramelized glaze without scorching.
Butcher Paper or Cutting Board: Rest the meat and slice your ribs cleanly after the cook. A large surface keeps things tidy and safe.
🔥 Variations
Pellet Grill Version: Set your pellet grill to 225 degrees Fahrenheit and follow the exact same 3 2 1 method step by step. Use cherry or apple pellets for the best flavor pairing with pork. Pellet grills are fantastic for this recipe because they maintain a very consistent temperature throughout the long cook without requiring constant fuel management. The smoke output on a pellet grill is lighter than an offset smoker, so consider adding a smoke tube filled with pellets during the first phase to boost smoke penetration and get a better smoke ring.
Gas Grill Version: Set up your gas grill for indirect heat by turning on only the outer burners and leaving the center burners off. Place a smoker box filled with soaked apple or cherry wood chips directly over one of the lit burners. Get the grill temperature to 225 to 235 degrees Fahrenheit and place your ribs over the unlit center burners. Replenish the wood chips every 45 minutes during the first phase. The smoke flavor will be lighter than a dedicated smoker but still adds excellent character to the finished ribs.
Competition Style Variation: For a competition-worthy bite-through texture rather than full fall-off-the-bone tenderness, shorten the foil braise phase from 2 hours to 1 hour and 15 minutes. Competition judges look for a clean bite that releases from the bone without the entire rack falling apart. Keep everything else the same and increase your sauce layers to three coats during the final phase for a high-gloss competition-ready presentation.
Dry Rub Only Version: Skip the BBQ sauce entirely in the final phase for a Memphis-style dry rib experience. Instead of saucing during the last hour, mix together 2 tablespoons of your original dry rub with 1 teaspoon of celery salt and dust it lightly over the ribs at the 30-minute mark of the final phase. The dry finish lets the bark and smoke flavor take center stage and is a favorite among purist pitmasters who believe a great rib needs no sauce at all.
Spare Ribs Version: The 3 2 1 method was actually originally developed with spare ribs in mind before it was adapted for baby back ribs. Spare ribs are larger, fattier, and more forgiving. When using spare ribs, increase each phase by about 30 minutes for a total cook time closer to 7 to 7.5 hours. Trim your spare ribs St. Louis style before smoking – remove the skirt meat and the chine bone section to create a uniform rectangular rack that cooks evenly.
❓ Pitmaster FAQ
What internal temperature should smoked baby back ribs reach?
Baby back ribs are best pulled from the smoker when the internal temp reads between 195 and 203 degrees Fahrenheit in the thickest part of the meat between two bones. At this temperature range the collagen has fully broken down into gelatin, giving you that fall-off-the-bone tenderness. Use an instant read thermometer for an accurate reading rather than relying solely on time, since every smoker and every rack of ribs can vary slightly.
Do I have to use the foil wrap phase in the 3 2 1 method?
You do not have to wrap, but skipping the foil phase will significantly change your results. The wrap phase is what powers through the stall and creates the extreme tenderness the 3 2 1 method is famous for. Without it, your ribs will have a firmer bite and a longer overall cook time – often 5 to 6 hours unwrapped rather than the standard 3 2 1 schedule. Pitmasters who prefer a firmer competition-style bite sometimes use a shorter wrap or skip it entirely and compensate with a longer low and slow smoke.
What is the best wood for smoking baby back ribs?
Fruitwoods are the top choice for baby back ribs because their mild and slightly sweet smoke complements pork without overwhelming it. Cherry wood is our top pick – it adds a beautiful deep mahogany color to the bark and a subtle fruity sweetness to the flavor. Apple wood is a close second and produces a slightly lighter smoke. You can also blend fruitwood with a small amount of hickory for a more complex profile, but keep the hickory to no more than one chunk or it can turn bitter over a 6-hour cook.
Can I make 3 2 1 ribs on a gas grill?
Yes, you can absolutely make 3 2 1 ribs on a gas grill. Set up your grill for two-zone indirect cooking by leaving the center burners off and using only the outer burners to maintain a temperature of 225 to 235 degrees Fahrenheit. Place a smoker box loaded with apple or cherry wood chips over one of the lit burners and replenish the chips every 45 minutes during the open smoke phase. The smoke flavor will not be as deep as a dedicated wood smoker, but the method and timing work exactly the same way.
How do I know when the ribs are done without a thermometer?
The best non-thermometer test is the bend test. Pick up the rack from one end with a pair of tongs and observe how it responds. A properly done rack will bend to roughly a 45-degree angle in the middle and you will see the bark crack slightly across the top surface. You can also check if the meat has visibly pulled back from the tips of the bones by about a quarter inch to half an inch. The toothpick test also works – a toothpick should slide through the meat between two bones with almost no resistance, similar to inserting it into soft butter.
Should I trim the ribs before smoking?
For baby back ribs, the main prep task is removing the membrane from the bone side of the rack – that is essential. Baby back ribs generally do not require much additional trimming. If you notice any hard chunks of fat or loose flaps of meat hanging off the rack, trim those off with a sharp knife so the rack cooks evenly. If you are working with spare ribs instead, a St. Louis trim is highly recommended to create a uniform rectangular rack that holds consistent thickness throughout the smoke.
How long do leftover smoked ribs keep and how do I reheat them?
Leftover smoked ribs keep well in an airtight container or wrapped tightly in foil in the refrigerator for up to 4 days. For reheating, the best method is to wrap them back in foil with a tablespoon or two of apple juice to add moisture, then place them in a 275-degree Fahrenheit oven or back on the smoker for 20 to 30 minutes until they are heated through. Avoid microwaving ribs if you can help it – the microwave tends to dry out the meat and steam away the bark texture you worked so hard to build.