The steak doneness test is the one skill that separates weekend warriors from true pitmasters, and the best part is you do not need a single piece of fancy equipment to pull it off. Every seasoned grill master has been in that moment standing over a ripping hot charcoal fire, tongs in hand, wondering if that ribeye is a perfect medium-rare at 130 degrees or if it has crept past the point of no return into well-done territory. The good news is your body is already carrying the tools you need to nail it every time.
Before thermometers became cheap and widespread, pit cooks across the American South, Argentine pampas, and Brazilian churrascarias were turning out flawless steaks using nothing but touch, visual cues, and decades of hard-won experience. A 1.5-inch thick ribeye over a 450-degree direct heat zone will tell you exactly where it stands if you know how to listen. The crust color, the firmness under your fingertip, the way the juices bead on the surface, and even the sound of the sizzle all paint a complete picture of what is happening inside that cut of beef.
In this guide we are going to walk through five reliable methods for testing steak doneness without a thermometer, from the classic hand test to reading color and texture like a pro. We will cover the visual bark on the exterior, what a proper rest the meat period looks like, and how to match what you feel and see to the internal temp targets you are chasing. Whether you are cooking over charcoal, gas, or a wood fire, these techniques will level up your game starting with your very next cook.
Steak Doneness Test: Tell When Steak is Done Without a Thermometer
Learning the steak doneness test is the mark of a true pitmaster. Skip the gadgets and use your hands, eyes, and instincts to pull perfect steaks off the grill every single time. These five battle-tested techniques will have you reading meat like a pro. Fire up the grill tonight and put these skills to work.
Ingredients
| AMOUNT | INGREDIENT | NOTES |
|---|---|---|
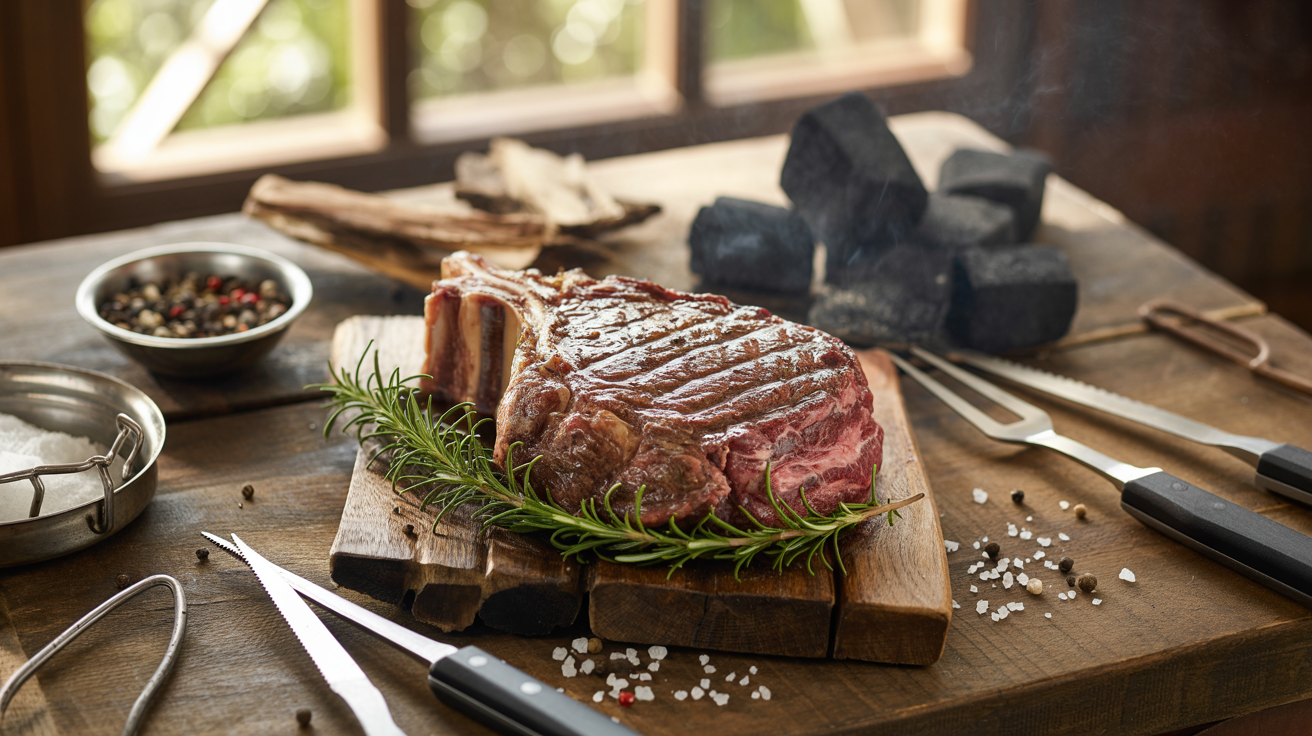
| 2 lbs | ribeye or New York strip steaks | 1.5-inch thick cut preferred for best results with all doneness tests |
| 2 tablespoons | kosher salt | apply 45 minutes before grilling for a dry brine that builds better bark |
| 1 tablespoon | coarse black pepper | freshly cracked for crust development |
| 1 tablespoon | garlic powder | optional but adds flavor to the exterior crust |
| 2 tablespoons | unsalted butter | for basting during the final minute of cooking |
| 4 sprigs | fresh rosemary or thyme | for basting with butter, adds aroma and visual appeal |
| 1 tablespoon | neutral cooking oil | avocado or canola oil to coat grates and prevent sticking |
Instructions
Nutrition (per serving)
The BBQ Story Behind This Recipe
The art of reading meat doneness by touch and sight goes back thousands of years before the concept of a calibrated kitchen thermometer even existed. Ancient civilizations across the Mediterranean, the Middle East, and the Americas cooked meat over open fires and relied entirely on sensory cues to know when a cut was safe and satisfying to eat. In the American BBQ tradition specifically, pit masters working low and slow over smoldering hardwood in the Carolinas, Texas, and Kansas City developed an almost supernatural ability to read their meat. They pressed, poked, lifted, and observed over years of practice until the skill became second nature. The feel of a brisket giving way under a thumb press or a rack of ribs bending at just the right angle became the gold standard of doneness long before any digital readout could compete.
With steaks specifically, the culture of cooking over live fire gave rise to regional techniques that persist today. Argentine asado masters, Brazilian churrasco grill cooks, and Texas steakhouse pit men all developed their own tactile vocabulary for reading a cut of beef. The hand test, which compares the firmness of your palm at different points to the feel of a steak, became widely taught in professional kitchens during the twentieth century as a quick and reliable backup when technology was not available. Even today in the most high-end steakhouses in New York and Chicago, experienced line cooks will press a finger into a filet or a New York strip to double-check what the thermometer says, because the hands do not lie. That tradition of reading meat through feel, sight, and instinct is the backbone of everything we practice here at GrillMasterHQ.
Hot Off the Grill
A Closer Look
Pitmaster Tips for Best Results
- Always start with steaks that are at least 1 inch thick when practicing these doneness tests. Thinner steaks cook so fast that the window between rare and well-done is only about 60 seconds and the tactile differences are much harder to feel.
- Practice the hand test with a thermometer alongside you for your first 5 to 10 cooks. Press the steak, make your guess, then verify with a thermometer. Over time your fingers will build a muscle memory database that becomes incredibly accurate without any tool.
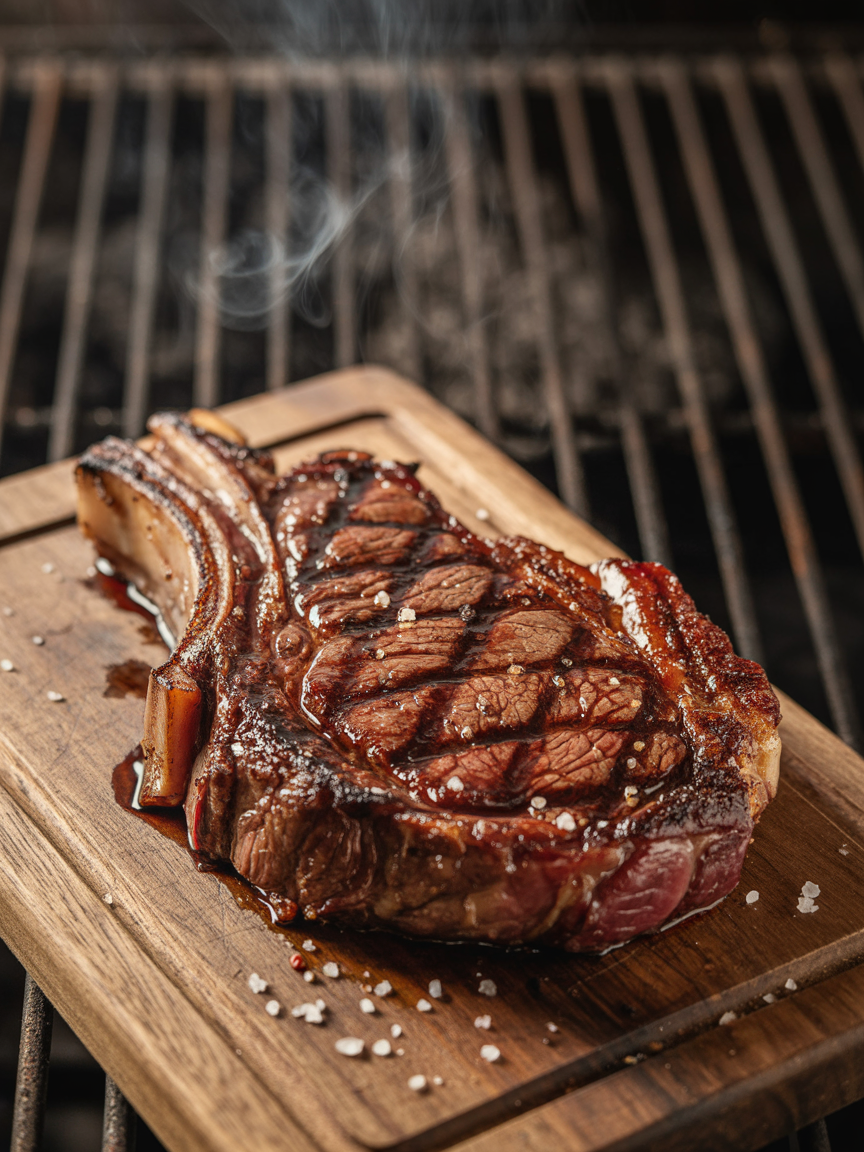
- The juice bead test becomes more reliable when you do not flip the steak repeatedly. Every flip you add slows the moisture migration to the surface. Flip once for best results and let the beads develop naturally on the second side.
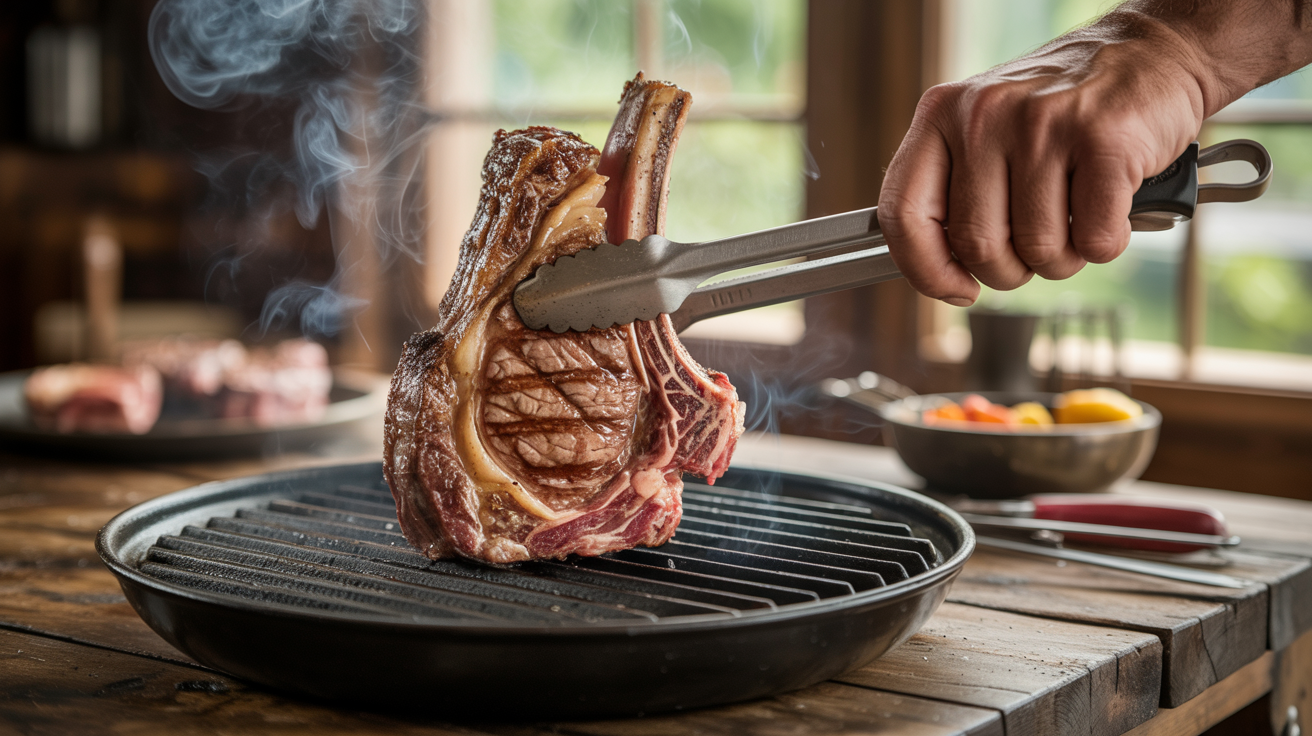
- Grill temperature consistency makes every doneness test easier to apply. A 450-degree direct zone on a clean, well-oiled grate will give you roughly 3 to 4 minutes per side for medium-rare on a 1.5-inch steak. Know your grill and that timing baseline becomes a powerful doneness reference all by itself.
- Always account for carryover cooking when you pull the steak. If you are chasing a 130-degree medium-rare finish, pull the steak when it feels like it is sitting just below medium on your hand test. The rest the meat period will carry it the rest of the way. Pulling too late is the number one cause of overcooked steak among home grillers.
🔧 Pitmaster Equipment
Charcoal Grill or Gas Grill: A solid two-zone fire setup gives you the direct heat to build a proper sear and crust on your steak, which is critical for reading color and bark as a doneness cue.
Long Tongs: Keep your hands safe while flipping and also allow you to gently press and feel the steak without burning your fingers on the grate.
Instant Read Thermometer (for calibration practice): Use it alongside these hand tests at first to train your instincts. Over time you will need it less, but it is the perfect teaching tool when learning the steak doneness test.
Cast Iron Skillet or Grill Grates: Heavy cast iron holds and transfers heat evenly, giving you consistent crust development and predictable cooking times that make visual doneness cues more reliable.
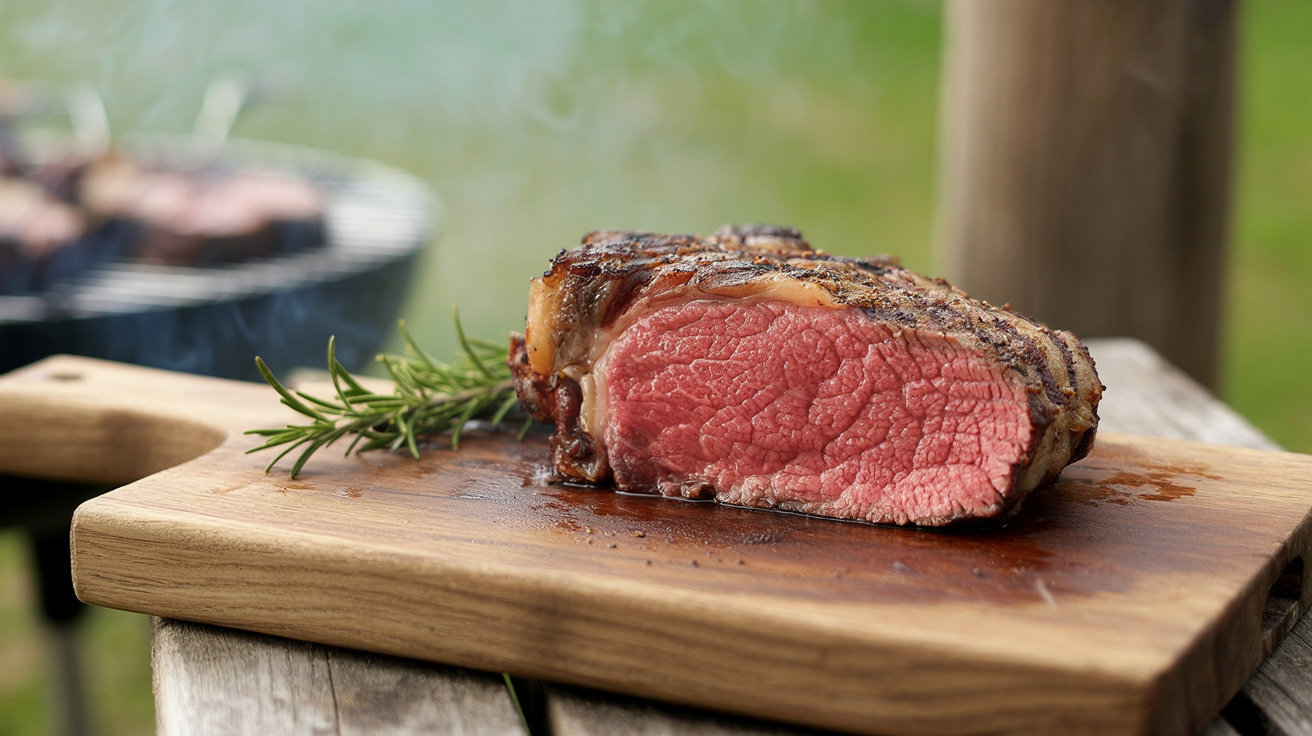
Cutting Board with Juice Groove: Essential for the rest the meat phase. A grooved board catches those precious juices and helps you observe color and texture when you slice to check doneness.
Sharp Boning or Slicing Knife: A clean cut gives you an accurate cross-section view of the interior color, which is the most reliable visual doneness test of all.
🔥 Variations
Reverse Sear Method: Instead of searing first, start your steak over the indirect zone at around 225 to 250 degrees and cook it low and slow until it is within 10 degrees of your target doneness. Then blast it over the direct heat zone for 60 to 90 seconds per side to build the bark. With the reverse sear the internal temp is so even throughout the steak that the hand test becomes remarkably consistent and accurate.
Cast Iron Skillet on the Grill: Preheat a cast iron skillet directly on your grill grates over the hot zone for 5 minutes until screaming hot. Sear your steak in the dry skillet for 2 minutes per side, then add butter and herbs and baste. The cast iron holds heat so evenly that your timing cues and poke tests translate perfectly. This method is ideal for thinner cuts where grate searing makes it harder to control the cook.
Tomahawk or Thick Cut Version: For a 2-inch or thicker tomahawk ribeye or cowboy steak, the hand test and poke test still apply but your timing will stretch to 5 to 6 minutes per side over direct heat before you need to move it to the indirect zone to finish. The juice bead test is especially reliable on thick cuts. Look for consistent beading across the full top surface before pulling. Always rest a thick cut for a minimum of 10 minutes.
Pellet Grill Version: Set your pellet grill to 450 degrees with the flame broiler open for direct searing. The even heat distribution on a pellet grill makes timing-based doneness cues very reliable. Follow the same hand test and poke test steps. The added smoke flavor from the pellets will also develop a gorgeous smoke ring just below the bark that serves as a visual cue of a properly cooked exterior.
❓ Pitmaster FAQ
What is the most reliable steak doneness test without a thermometer?
The poke test combined with the hand test is the most reliable combination. Press your steak with your finger or tongs and compare the firmness to the zones of your open palm. Rare feels like the soft pad below your relaxed thumb. Medium-rare feels like that pad when your thumb touches your middle finger. Practice this alongside a thermometer for several cooks and your accuracy will improve dramatically.
How do I tell if a steak is medium-rare by looking at it?
Look for two visual cues. First, small red or pink juice beads forming on the top surface while the steak is still on the grill indicate the center is approaching medium-rare. Second, after you rest the meat and slice in, a medium-rare steak will show a warm red to pink center across 60 to 70 percent of the cut with a fully browned crust. The color should be vibrant and the cut surface should glisten, not run with juice.
Can I use the finger poke test on any cut of steak?
Yes, but the test is most accurate on cuts that are at least 1 inch thick and relatively uniform in thickness like ribeye, New York strip, filet mignon, and sirloin. Very thin steaks like skirt or flank cook so quickly that the doneness window is narrow and the tactile differences are harder to detect. For thin cuts, rely more on timing and color rather than the poke test.
Why does my steak always feel undercooked but end up overcooked when I cut it?
This is a carryover cooking issue. When you pull a steak off the grill the internal temp continues to rise for several minutes because the exterior is much hotter than the center. A steak that feels like medium on the grill will finish at medium-well after resting if you do not account for this rise. Pull your steak when it feels one doneness level below your target and then rest the meat for 5 to 8 minutes to let carryover do its work.
Does the steak doneness test work on thick cuts like tomahawk steaks?
Absolutely, but thick cuts require more time over indirect heat to reach your target doneness from the inside out. A 2-inch tomahawk will need 5 to 6 minutes per side over direct heat and then additional time on the indirect zone. The poke test is still valid but the steak will feel firmer on the outside from the crust development before the center has fully caught up. Trust the juice bead test and the carryover rest on thick cuts above all else.
Is it safe to eat steak that is still pink in the middle?
Yes, whole muscle beef steaks like ribeye, sirloin, and filet mignon are safe to eat at medium-rare, which is a pink or red center. Unlike ground beef, harmful bacteria on whole cuts of beef exist only on the exterior surface, which is fully cooked during searing. The USDA recommends a minimum internal temp of 145 degrees with a 3-minute rest for whole muscle beef, which corresponds to a medium doneness level. Medium-rare at 130 to 135 degrees is widely accepted and safe for healthy adults eating whole muscle steaks.